Continua supports using Windows authentication include three authentication modes which can be used to connect to the web application, this guide will step you through configuration of IIS and the Continua service.
Step by Step
.
- Forms authentication allows users to access the site by entering a Continua username and password on a login page.
- LDAP authentication allows users to log in using their Windows user account. If your browser supports Integrated Windows Authentication then you will automatically be logged in with your current Windows user account. Browsers that have not been configured to use Integrated Windows Authentication will pop up a dialog for the user to enter their username and password.
- Mixed authentication allows users to log in using either Forms or LDAP authentication.
The installer will automatically configure the authentication mode based on the option you chose on the Authentication page of the setup wizard. This guide describes the steps to configure the authentication mode manually. This will be necessary if you have chosen to skip the IIS confguration in the setup wizard or you wish to change the authentication mode at a later date. Before configuring LDAP or Mixed ensure that the Windows Authentication festure is installed and the website is configured correctly in IIS (see IIS Configuration for LDAP and Mixed authentication modes)
Step by Step
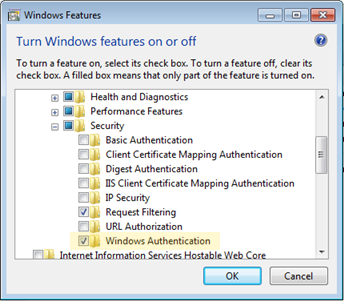
- Open Make sure that the machine has the 'Windows Authentication' feature installed for IIS. This can be installed via Control Panel -> Programs and Features -> Turn Windows features on or off -> Internet Information Services.
In the Internet Information Services (IIS) Manager, select the Continua web site, then select the 'Authentication' feature.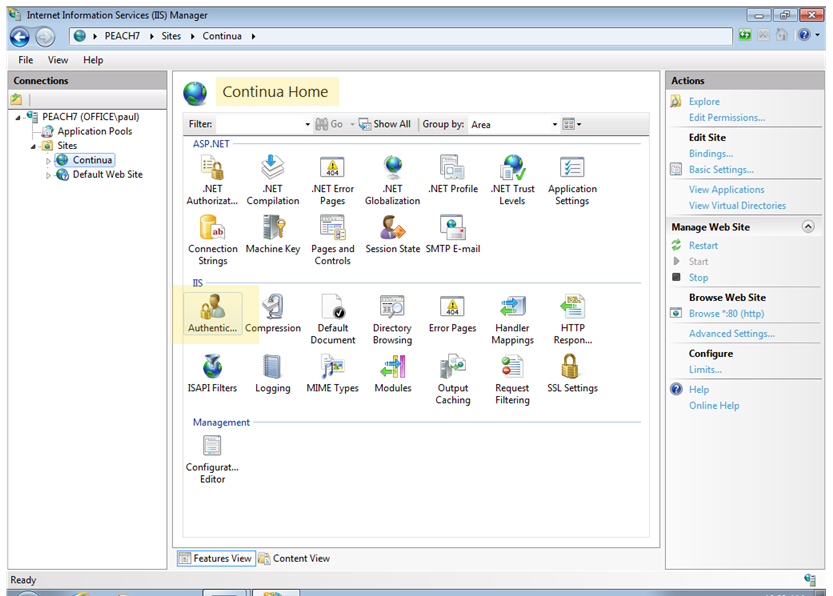
In the 'Authentication' feature view, set the following options: - Anonymous Authentication to DISABLED
- Forms Authentication to DISABLED Windows Authentication to ENABLED
- Open the following file, changing the path if necessary, 'C:\Program Files\VSoft Technologies\ContinuaCI\Server\Continua.Server.Service.exe.config'.
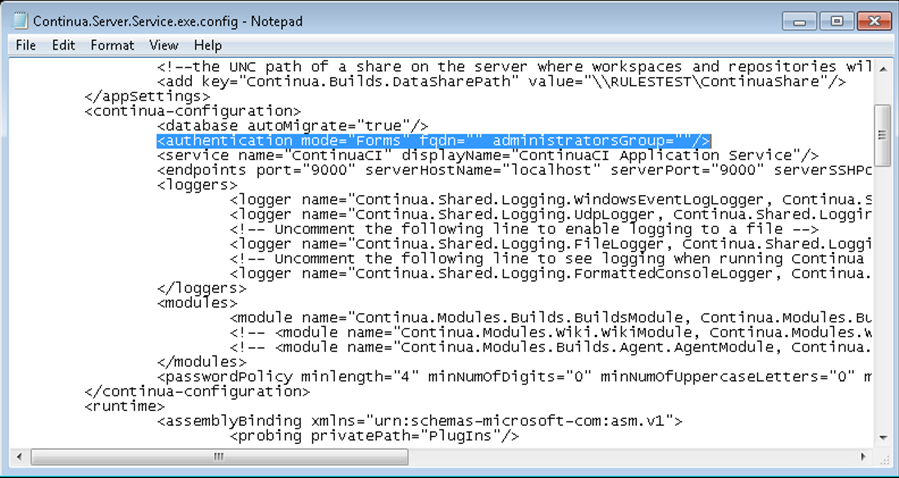
- Add the following line to or modify the 'authentication' node under the 'continua-configuration' node, changing the attribute values to reflect your environment, '<ldap enabled<authentication mode="trueLDAP" fqdn="office.vsoftcompany.local" administratorsGroup="Continua Administrators" />'
- mode - this is either Forms, LDAP or Mixed.
- fqdn - The fully qualified domain name of your domain for LDAP and Mixed modes.
- administratorsGroup - The LDAP group that contains the users who will automatically have administrative rights in Continua, users in this group will be used able to configure Continua for the rest of the organisation.
NOTE: When logging into Continua for the first time in LDAP authentication mode, the user must be a member of the group specified by administratorsGroup.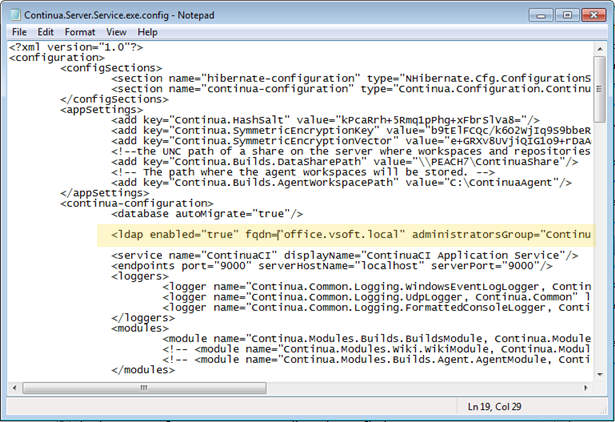
- groupsContainer - This optional attribute allows advanced administrators to specify an LDAP container e.g. "OU=continua,DC=office,DC=company,DC=local". If this attribute is provided, then LDAP users must be a member of a group located under the specified container before they can be given access to Continua. The administrators group must also be located under the specified container.
- mode - this is either Forms, LDAP or Mixed.
- Save the file, then restart the ContinuaCI Application Service via the Control Panel -> Administrative Tools -> Services.

Close the Internet Information Services (IIS) Manager and open Notepad with Administrative rights (right click, Run as Administrator).
...