Getting Continua to work with a subversion repository over SSH takes a couple of additional steps.
Step 1.) Install Putty
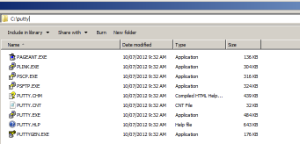
Download the set of putty tools at http://www.chiark.greenend.org.uk/~sgtatham/putty/download.html
Install them into a directory on the machine your Continua server is running.
Step 2.) Generate a public/private key
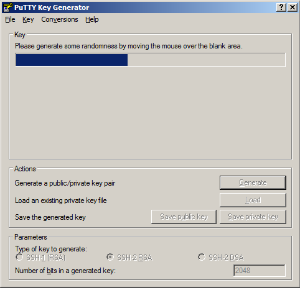
In the putty directory you just installed, look for the executable called PuTTYgen.exe. Open it and click the Generate button. You'll need to move the mouse cursor around until the progress bar reaches the end.
Once it's finished, click the Save private key button, select Yes when it asks you to save the key without a pass phrase.
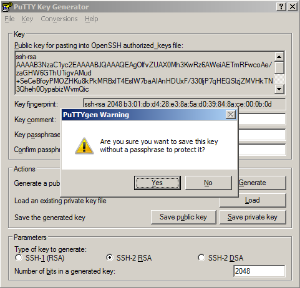
Name the file and save it in your chosen directory. I saved mine as C:\private_key.ppk.
Step 3.) Storing public key on the SSH Server
If your repository resides on a hosting website like codebashq, you'll need to follow their guide on how to add a public key to your repository hosted there.
If your repository is hosted on a machine which you have SSH access to then you will need access to it through a username and password. For machines using OpenSSH or a common variant, the public key you generated above will need to be put in the authorized_keys file. You can create (or find) that file in the .ssh directory of the home directory of the user you logged in, eg. /home/username/.ssh/authorized_keys
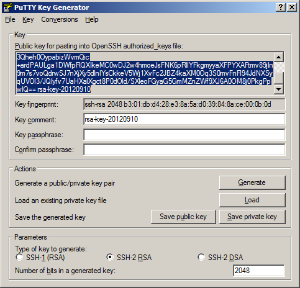
The public key needs to be in a format recognized by your SSH server. If it's the common ssh server (OpenSSH) that comes with *nix variants then the format you want is what PuTTYgen.exe outputs in the field "Public key for pasting into OpenSSH authorized_keys file:"
Paste it into your authorized_keys file and save it.
Step 4.) Cache key in registry
To check everything worked, log into the SSH server using plink.exe. You'll need the SSH server's host name and the user you want the Continua server application to log in as. On your Continua server run this command:
plink.exe -ssh -i "path/to/privatekey/privatekey.ppk" user@ssh_server_name |
For me, this command is:
C:\putty\plink.exe -ssh -i "C:\private_key.ppk" vinnie@10.0.0.124 |
You should then see output like this:
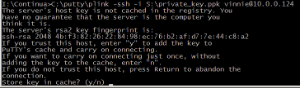
Type y then hit enter. If you were sent to the SSH server's command line then it worked successfully. If you were prompted with a password then something went wrong. This usually means the keys didn't match. Check your authorized_keys file and make sure the public key is in the right format and matches in private key you specified to the plink command.
Note: If you skip this step or something went wrong, Continua will not work. The next time Continua tries to run a command over SSH, it will be prompted for a password or for caching the key in the registry. Once this happens there's no way for Continua to recover. You will need to kill the plink.exe process running on the Continua server then stop the Continua server.
Step 5.) Configure subversion config to support SSH
Before subversion can use SSH command, you will need to append this line:
ssh=/path/to/putty/plink.exe -i /path/to/private_key.ppk
underneath the [tunnel] section of subversion's config file.
The line I appended looks like this:
ssh=C:/putty/plink.exe -i C:/private_key.ppk
You can find the subversion config file in this location: %APPDATA%\Subversion. Enter it into the Windows Explorer path bar or the Run section of your start menu.
Step 6.) Verify everything worked
To check everything worked, use the svn command on the Continua server and query the SSH Subversion repository. Here's the command I used:
svn info svn+ssh://vinnie@10.0.0.124:/home/vinnie/svn_test
You should get the result of svn info about the remote repository.
Note: If you are prompted for a password then something has gone wrong with the setting up of private/public keys.