Before reading this page, it is highly recommended you read the Variables, Objects & Expressions page. |
Variables store dynamic values which can be used during the build process. A full description and further conceptual information can be found on the Variables, Objects & Expressions concept page.
This page discusses information regarding the hands-on use of variables.
Each variable must be assigned a type which limits what time of information can be stored in a variable. Note that all variable types, except expression variables, can have their values changed during the build process.
A full list of variable types can be found on the Variable Types page.
All configuration variables can be assigned a prompt type which enables users to set a variable's value when queuing a manual build.
Configuration Variables can be given the following prompt types:
Read the Variable Prompt Types page for more information on these prompt types.
Variable namespaces control where a variable exists within the Continua CI environment. Namespaces also provide variables with a scope which limits what each build can access. For example, if you create a configuration variable then only builds from that configuration can access that variable.
Continua uses a namespace hierarchy (as shown below) to determine which variable value should be returned when no namespace has been defined. Read the Variable Namespace Hierarchy section on the Variables, Objects & Expressions concept page for a closer look at how the Continua hierarchy works.
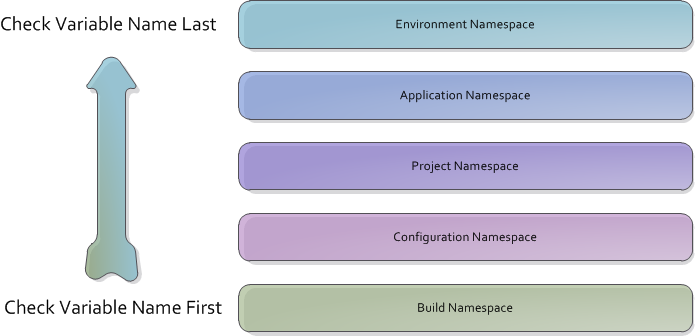
Build variables belong to a specific build however they cannot be created manually. They are used to override any of the variables listed below. See the next section for more information on how build variables work. Build variables can be accessed with the %MyVariableName% syntax (Note that you cannot use the Build namespace prefix).
When a build is created, it automatically creates build variables for every configuration variable that has been defined. It automatically sets the build variable's value to the same value as the configuration variable unless the value is overridden automatically with Triggers or manually through the queue dialog.
Configuration variables are created on a specific configuration and they can only be accessed by builds that belong to that configuration. Configuration variables are read-only at run time and they can be accessed with the %Configuration.MyVariableName% or %MyVariableName% syntax.
Configuration Variables can be created, modified and deleted through the Configuration Wizard.
Project variables are created on a specific project and they can only be accessed by configurations and builds that belong to that project. Project variables are read-only at run time and they can be accessed with the %Project.MyVariableName% or %MyVariableName% syntax.
Project Variables can be created, modified and deleted through the Project Wizard.
Application variables are system wide variables that every build, configuration and project can access. This means that any variable defined in the application namespace can be used anywhere in Continua CI. These are the highest variables that the user can define. Application variables are read-only at run time and they can be accessed with the %Application.MyVariableName% or %MyVariableName% syntax.
Application Variables can be created, modified and deleted through the Variables page in the administration section.
Environment variables are created from the server's environment variables automatically and cannot be changed. These variables can be accessed system wide by every build. Environment variables are always read-only and they can be accessed with the %Environment.MyVariableName% or %MyVariableName% syntax.
Configuration variables have an extra option when creating them, Prompt Type. If a prompt type is set, you will be required to supply a value for that variable when you manually start a build. The prompt type supplied determines the input field in which you supply the value.
In this example, I've created a variable called MakePackages and set it to a Boolean prompt type.

For demonstration purposes, the mock Configuration this variable belongs to has two stages. Stage 1 builds my project and out puts a bunch of file. Stage 2 takes the output of Stage 1 and generates an installer (a.k.a makes the packages). I don't want to make the packages every time I execute the configuration though so I've setup the configuration to only execute stage 2 when the MakePackages configuration variable is set to true. By making this a prompt type variable, I will be able to supply the value of this variable whenever I manually start a build. When I manually start a build, I will see the following dialog.

Under the Variables heading, you can see the MakePackages variable in a checkbox format. When you create a Boolean prompt type variable, it gets rendered as a checkbox because the value can either be true (checked) or false (unchecked). Now when you manually queue the configuration, you can set the value of the variable by checking or unchecking the checkbox.
In this example, I've created a variable called TagBuildAs and set it to a Selection prompt type. This type of prompt type will display a text field in which you supply all the possible values for this variable. The value you supply in the Value field must be in the list of values you supply in the Options field.

For demonstration purposes, the mock Configuration this variable belongs to has a Tag Build action which contains the value %TagBuildAs% as one of its values. This means the build will be tagged with whatever value the variable TagBuildAs contains. By making TagBuildAs a selection prompt type variable, the user can select which value to use when manually starting a build. If you were to manually start a build, you would see the following dialog.

Now when you start a build you can specify the value from the drop down list.
In this example, I've created a variable called AgentsToRunOn and set it to a Multiple selection prompt type. This type of prompt type will display a text field in which you supply all the possible values for this variable. The value you supply in the Value field must be in the list of values you supply in the Options field.

As a result of this prompt type variable, you will now see each agent name with a checkbox next to it when you manually start a build.

For demonstration purposes, the mock Configuration this variable belongs to has a check before each stage (using Agent Requirements in Stage Options) that checks to see if the Agent's hostname is in the list of options you selected when the build was manually started. Here's an example of what a stage might look like with this kind of agent requirement.

At build time, %AgentsToRunOn% will contain every value you ticked on the queue dialog, in other words, every agent host name you specified. By selecting the Contains operator then specifying the expression $Agent.Hostname$, you're basically saying "Only run this stage when the list of agents I selected on the queue dialog contains the name of any agent registered with Continua".
Note: When explicitly forcing a stage to run on an agent, you bypass all the advantages of agent compatibility. If the agent you forced a stage to run on is unable to execute the stage then the build will sit on the queue waiting for a compatible agent whose name is the one you explicitly told the stage to run on. It will not under any circumstance pick an agent that's compatible whose name doesn't match the one or ones you specified.