Stage Options provide a way to customise how stages behave within your build pipeline.
How to access stage options
Stage options can be accessed by double clicking on a stage arrow from the 'Stages' workflow section. A dialog showing options for the respective stage will be displayed:

Stage Options
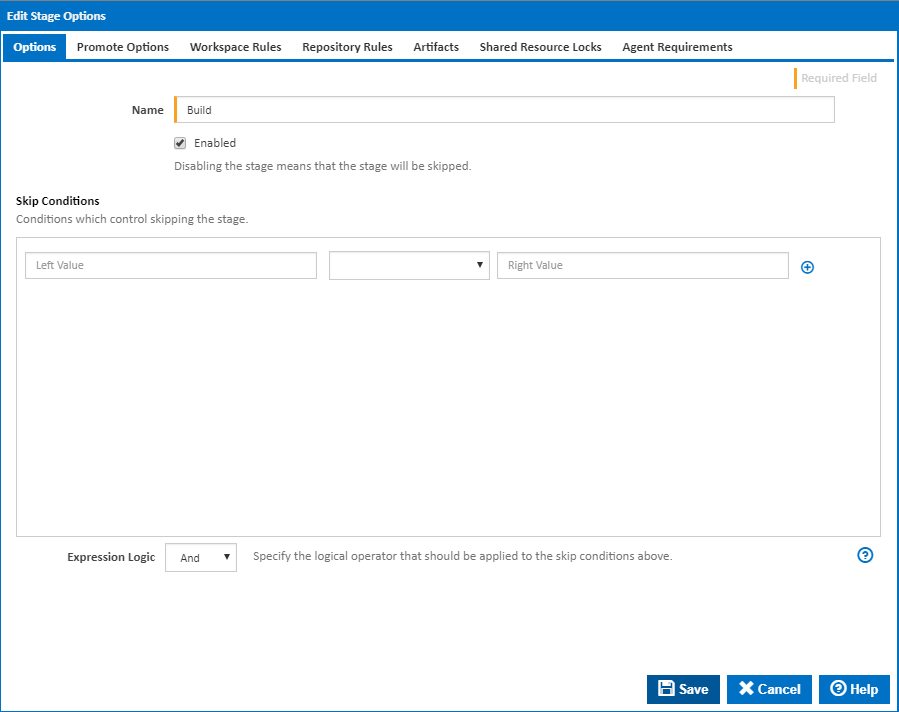
Name
The name of the stage
Enabled
Should the stage be considered when running a build.
Skip Conditions
Conditions which result in this stage being skipped. Expressions can be used here to build up a set of conditions. Note that multiple conditions are joined together with a logical AND - as a result, if any of the lines evaluate to false, the respective stage will be run.
Promote Options
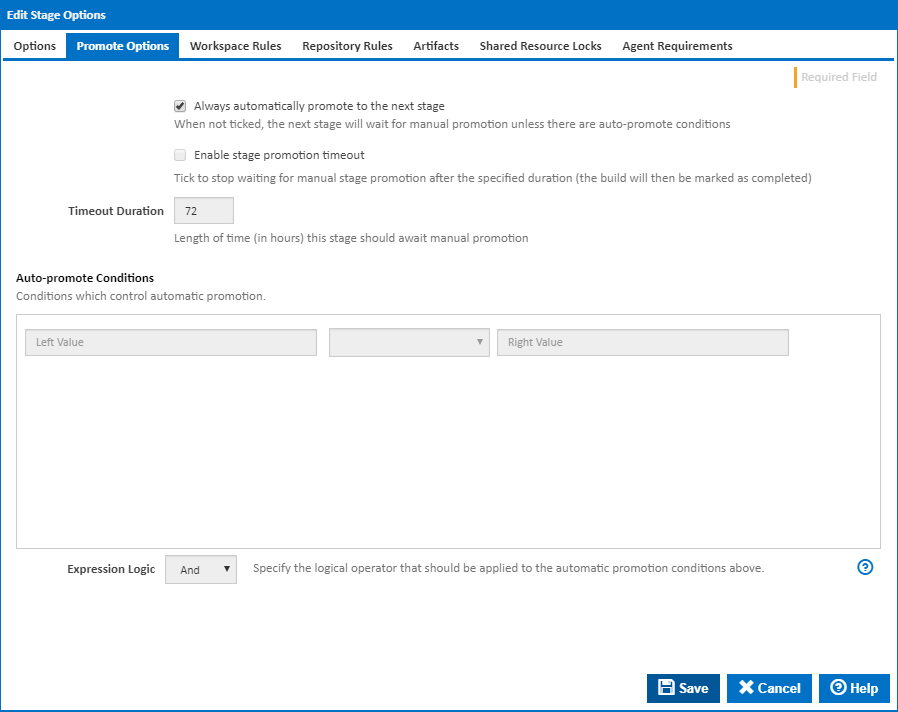
Always automatically promote to the next stage
Determines if this stage should be automatically promoted once it has completed executing, or if it should await manual promotion.
Once a stage has completed, the options on this tab determine whether the build automatically continues onto the next stage. If this option is not ticked the 'Auto-promote conditions' come into effect to determine if the build should continue. Please note that the Auto-promote Conditions are joined together with a logical AND. As a result, if any of the lines evaluate to false, the stage status will be set to 'Stage Pending Promotion'.
Enable stage promotion timeout
Determines how long a the build should wait for promotion to the next stage. If this is ticked then the build will be marked as completed once the Timeout Duration is reached. This will allow the build to be cleaned up, but will prevent the build from being promoted.

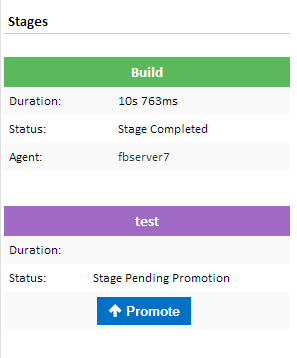
Clicking on the Promote button will trigger the next stage.
Workspace Rules
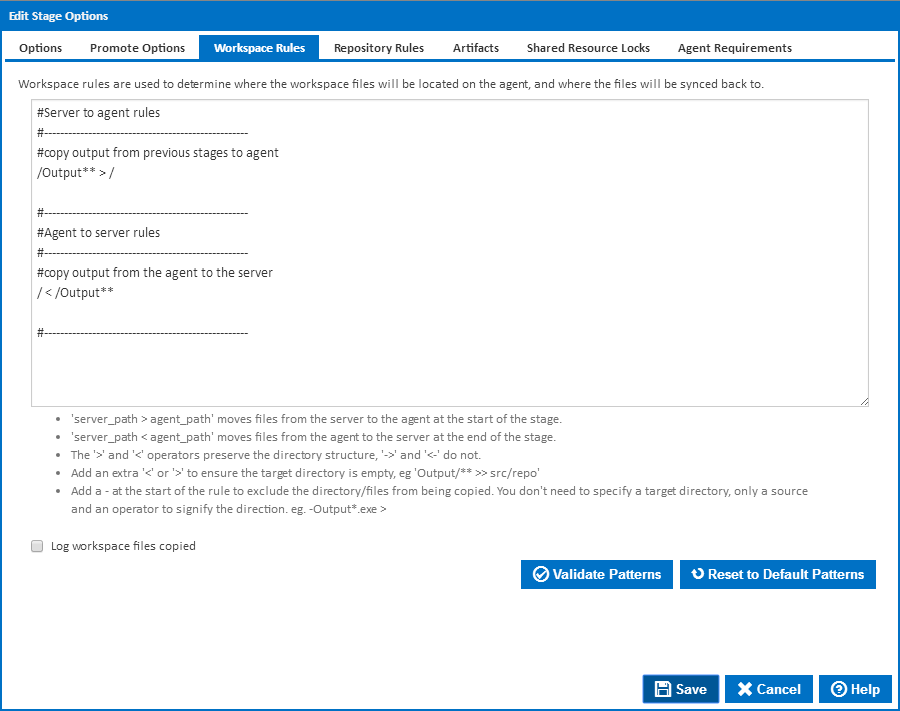
Workspace rules allow you to control which files in the workspace are synced or not synced between the server and the agent. Workspace rules are not used to move files from external locations into the workspace. For getting files into your workspace, use the Copy Action or Repository Rules. Rules are split into include rules and exclude rules:
Include Rules
Include rules allow you to specify which files should be copied between the agent and server. These rules use the following syntax: <server_pattern> <operator> <agent_pattern>
Every rule must follow this syntax with the <server_pattern> to the left of the operator and the <agent_pattern> to the right, regardless of whether you are copying from either the agent or the server.
The operator specifies the direction of the rule and the action to take when moving the file. The table below lists the operators and their behaviour:
Operator | Direction | Behaviour |
|---|---|---|
| > | Server to Agent | Match files on the server using the server_pattern and copy them to the destination specified by the agent_pattern. Preserves paths. |
| -> | Server to Agent | Match files on the server using the server_pattern and copy them to the destination specified by the agent_pattern. Doesn't preserve paths. |
| >> | Server to Agent | Match files on the server using the server_pattern and copy them to the destination specified by the agent_pattern. Empties the destination directory before copying the files. |
| < | Agent to Server | Match files on the agent using the agent_pattern and copy them to the destination specified by the server_pattern. Preserves paths. |
| <- | Agent to Server | Match files on the agent using the agent_pattern and copy them to the destination specified by the server_pattern. Doesn't preserve paths. |
| << | Agent to Server | Match files on the agent using the agent_pattern and copy them to the destination specified by the server_pattern. Empties the destination directory before copying the files. |
The server pattern is always to the left of the operator and the agent pattern is always to the right. When using a Server to Agent operator, the server pattern is the source and the agent pattern is the destination. When using an Agent to Server pattern, the server pattern is the destination and the agent pattern is the source.
The destination is not treated as a pattern and should not contain wildcards - it is purely a directory in which the matched files from the source pattern are copied. The source pattern is used to find files in the source location, therefore this pattern must always contain a wildcard. The wild cards used are:
Wildcard | Behaviour |
|---|---|
| ** | Matches anything in any directory |
| * | Matches any files in the directory |
| ? | Matches a single character in a filename/directory |
Scenarios and examples of workspace include rules can be found on the Workspace Rules page.
More information about pattern wildcards can be found on the Ant Pattern Usage page.
Exclude Rules
An exclude rule is defined by putting a dash ( - ) at the start of the rule. An exclude rule only needs to specify an operator (for direction) and a source pattern. The operator type doesn't matter, as long as the direction of it correct. The destination pattern is irrelevant because the exclude source pattern is applied to all files captured by all include patterns.
Scenarios and examples of workspace exclude rules can be found on the Workspace Rules page.
Repository Rules
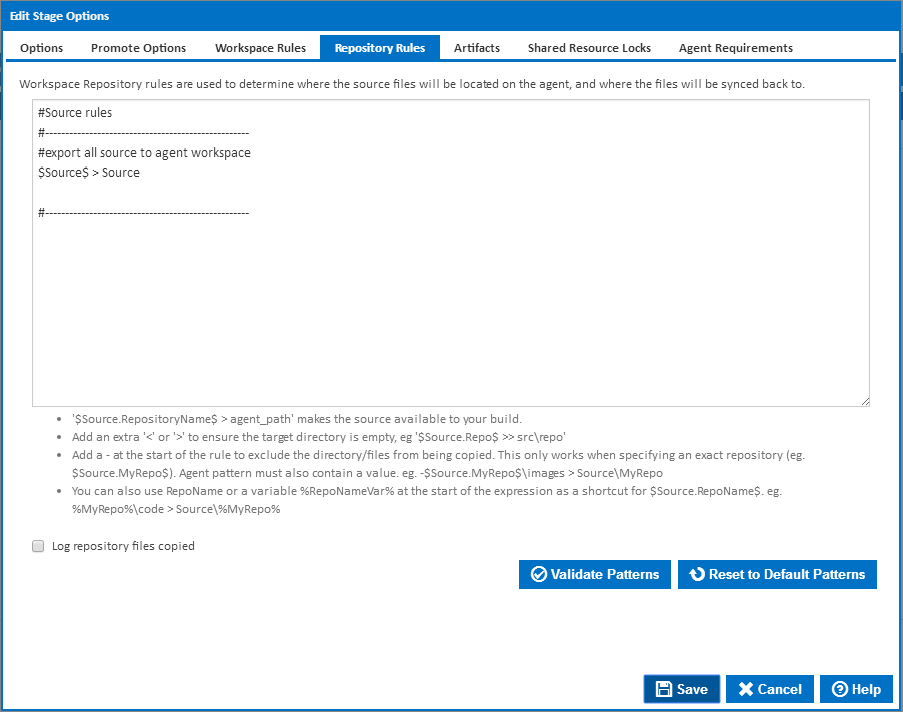
A repository rule is used to get files out of the repositories attached to the Configuration and into the agent's workspace. Repository rules look and function similar to workspace rules but have a few extra constraints.
- Repository rules must always be Server to Agent rules. If you need files in the repository synced back to the server then you would use an Agent to Server workspace rule.
- Repository rules will always preserve paths regardless of the operator you use.
- A repository rule's source pattern must always contain a reference to the repository using Query Syntax. Eg. $Source.MyRepo$ > MyRepo
- Unlike workspace rules, an exclude repository rule must always contain a destination directory.
In addition to explicitly specifying a repository using query syntax, e.g. $Source.MyRepo$, you can also specify all repositories attached a Configuration by using the syntax $Source$. Take note of where the repositories will be placed when using this syntax though, if your rule is$Source$ > Repos, then your repository will be placed in Repos\<repository_name>. As you can see, the destination directory you specify in the rule is created, then another directory with the name of your repository is created and the repositories' files are placed into that directory.
You can also take advantage of wildcards when specifying a repository rule. For example, your rule can look something like this: $Source.MyRepo$\WebProject\** > MyRepoWeb. Here, we've specified the repository MyRepo but in addition also specified a directory within the repository. This rule will only copy the contents of that directory rather than the entire repository into destination directory MyRepoWeb.
Important: When creating your workflow and adding actions, you may want to use the $Source.MyRepo$ syntax to reference something in your repository. That syntax will only work in your action if you have specified a simple repository rule, e.g. $Source$ > Source or$Source.MyRepo$ > MyRepo. It will not work when you use a pattern to specify parts of a repository, e.g. $Source.MyRepo$\WebProject\** > MyRepoWeb. If you want to use files in MyRepoWeb then reference it as if you were referencing anything else in the workspace, e.g.$Workspace$/MyRepoWeb/file.xml.
Scenarios and examples of repository rules can be found on the Repository Rules page.
More information about pattern wildcards can be found on the Ant Pattern Usage page.
Q. I'm using a Server to Agent rule to put the repositories' contents in the agent's workspace but the repositories' contents aren't in the server workspace, how does that work?
When a build starts and the workspace is initially created on the server, the contents of that build's workspace contain no trace of any repositories. Instead, the server will process the repository rules and determine which repositories need to be synced to the agent. The agent will then take note of those repositories and update its repository cache. The agent then runs the repository rules against the repository in its repository cache. This eliminates the need for the server to deal with any copying of repositories. It also has the advantage of making subsequent builds a lot quicker. Instead of having to copy the repository from the server to the agent for each build, the agent simply does a local copy from its repository cache into the workspace directory.
Artifacts
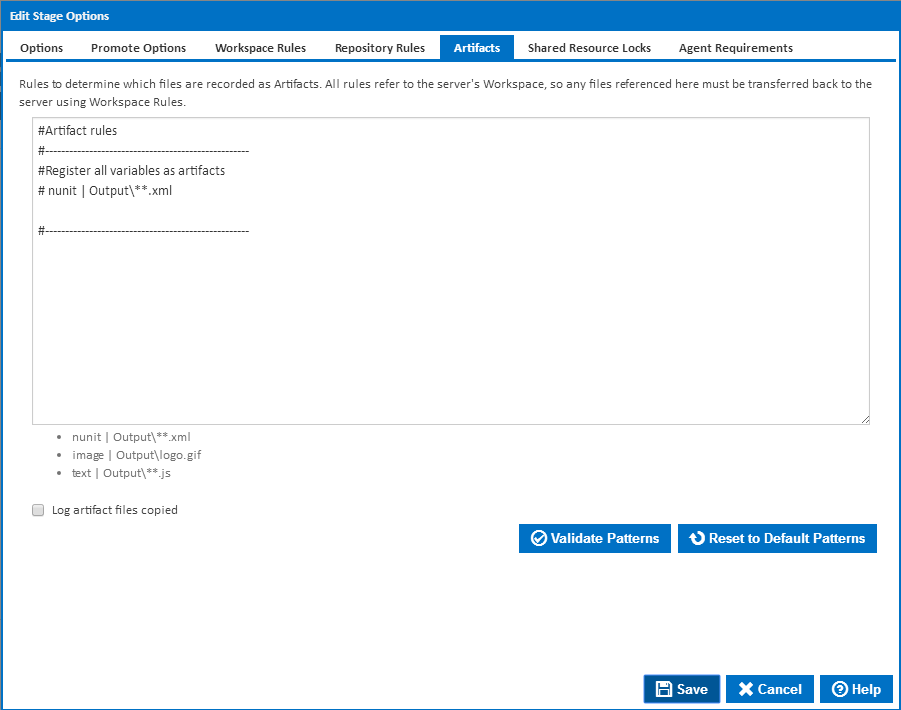
What are Artifacts?
Artifacts are a way to register important files with Continua CI. When a file is registered as an artifact, it will be listed on the Artifacts page with details of the file and the ability to download and possibly view that artifact, all through the Continua CI UI. All viewable artifacts can be viewed in their raw format which leaves the rendering of that artifact up to the browser you're using. Alternatively, you can specify a view type for that artifact which will use Continua's custom renderer to display the file.
Artifact Rules
Artifact rules are how you specify which files should be marked as artifacts. An artifact rule is purely a file or a pattern with a type tagged on the end of it. There's no concept of a source, destination or even a direction. It uses the same wildcards as workspace/repository rules but that's about all they have in common. Artifact rules are just a way of registering files as artifacts.
When registering an artifact, each file can have a type explicitly associated with it. These types tell Continua CI how certain files should be rendered on the artifacts page. The list of view types are: variable, image, and nunit. You need not worry about the variable type as that is for viewing the variable output files that are generated every build and automatically registered as artifacts. If you're registering an image as an artifact, use the image type when specifying an artifact rule. For nunit xml output files, specify nunit as the view type. If none of your artifacts match a view type then you don't need to specify one, just specify the file/pattern.
When specifying a view type, put it at the start of the rule followed by a vertical bar ("|") character then the pattern. Eg. nunit | **test*.xml. This will match all files in the workspace that contain the word "test" and have a xml file extension.
Important: Artifact registration only happens on the server side, therefore, the patterns are run against the workspace on the server. When writing your workspace rules, make sure you sync back the files you want registered as artifacts. For subsequent stages, make sure you don't delete artifacts registered in previous stages from the workspace on the server. One possible way of doing this without knowing is to create a rule that syncs files from the agent to the server and specifying that the destination directory (which would be on the server) be empty. In this case you would empty the directory with the artifact in it.
Scenarios and examples of registering can be found on the Artifact Rules page.
Shared Resource Locks
Note that Shared Resource Locks are available from version 1.8
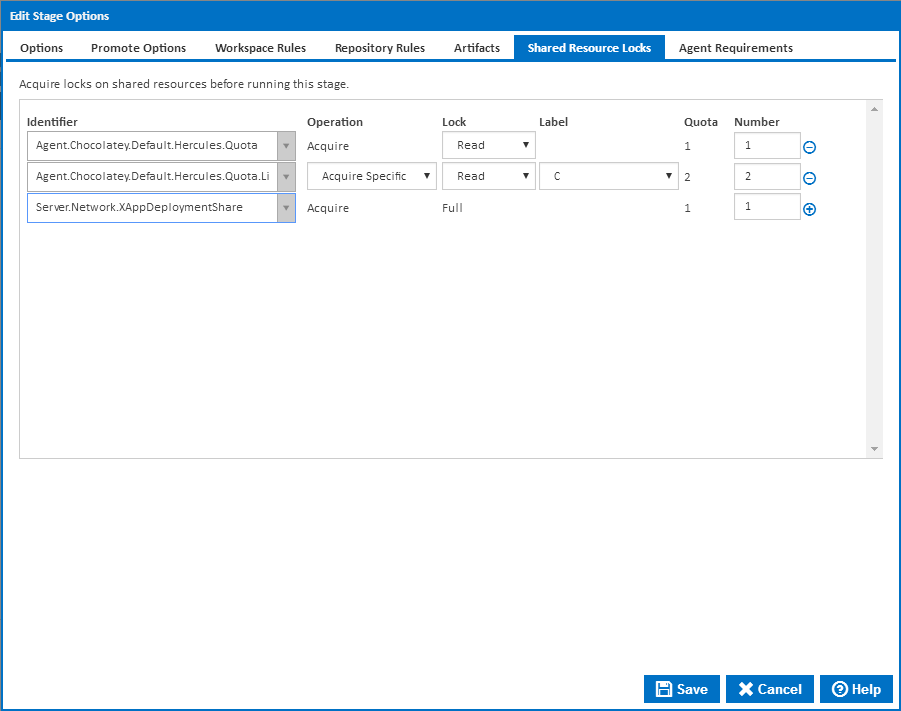
Stages can be configured to acquire shared resource locks before executing. The shared resources can be associated with the server or the agent selected to run the stage.
See Defining Shared Resource Locks for more details on editing Stage Shared Resource Locks.
Agent Requirements
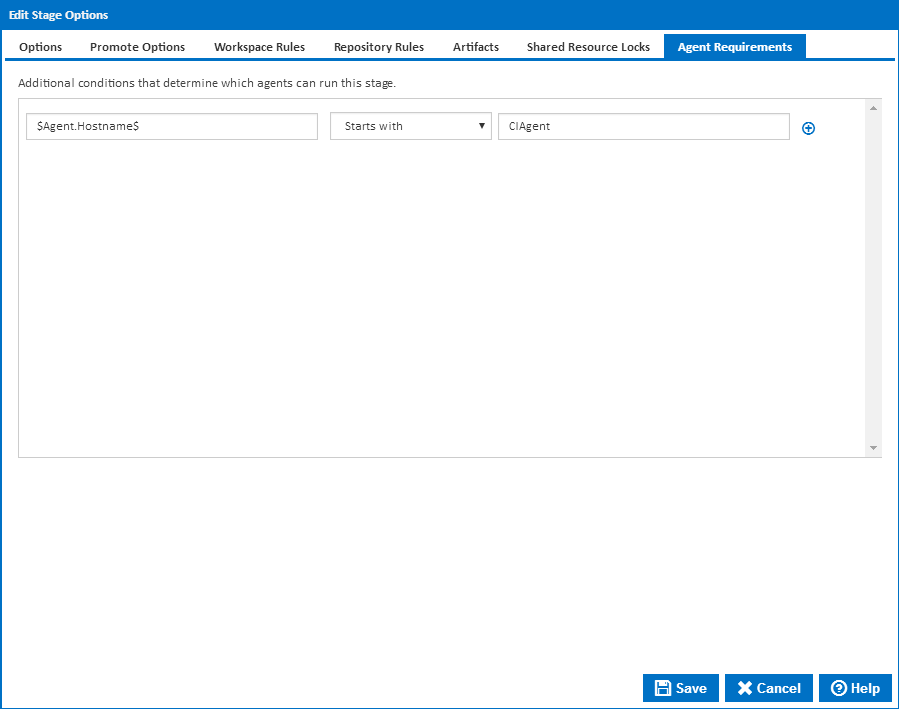
Agent requirements are a set of conditions that must be met before the stage will execute on a particular agent. In addition to using variables as condition values, you can also use the $Agent$ descriptor which gives you access to agent details like hostname, port and all property collector values. Note that these conditions give you fine grain control over the configuration and stages. It's possible to make the entire Configuration execute on a single agent, but having agent requirements allows you to force one stage to run on a specific agent while letting Continua decide which is the best agent to run the other stages on. If the rules are left blank then Continua CI will determine which agent should run that stage.
Here are some scenarios where you could make use of agent requirements.
- You have a trigger set up to execute every day at 3 in the morning. It executes a Configuration which is set up to take a copy of your main repository, archive it and send it to your backup server. The backup server also happens to act as a Continua CI agent and you want to take advantage of that, By using the backup server agent, the backup archive file will be created in the build's workspace on the backup server agent, then it's just a matter of copying that file from the build's workspace, into a directory on the backup server that handles backing files up. If you were to use an agent that wasn't the backup server then the copying of the archive file to the backup server would happen over the network. This is an ideal situation for an agent condition that forces a stage to run on a specific agent. To do this, you would reference the agent's hostname by using the descriptor $Agent.Hostname$ then select Equals from the drop down list and put the name of the agent in the right hand side input field.
- You've created a program or script that automates a whole lot of functionality like creating installers for your application, uploading them to a FTP server and sending out emails to your users. When you integrate it into Continua CI, you simply create a stage which has an Execute Program Action which executes your script. Because your script is creating installers, uploading files using FTP and sending out emails, your script needs to be executed on an agent that has your installer creator application, the ftp client and email application installed. To ensure the build runs on an agent with all three of those applications installed you would setup agent conditions for the stage that runs your script. First you would setup Property Collectors for each of the applications, all they would do is check if an executable exists (eg. MyFtpClient.exe) in the given path. Once they're setup, you can create an agent condition that checks for the existence of that application. You would first choose the Exist option from the drop down menu then use a descriptor like $Agent.MyFTPClient.Path$. This would force the build to only execute on an agent which has that path on it.
- You can select the agent you want a build or stage executed on when you start the build. Create a Configuration Variable called AgentToRunOn for example and make it a prompt type of Text. By doing this, every time you manually start a build, it will ask you what Text value you would like to provide to the AgentToRunOn variable. When setting up your agent conditions on a stage, you would use the $Agent.Hostname$ descriptor for the left value, select Equals from the drop down list and type %AgentToRunOn% for the right value. By doing this, you allow the user to type in which agent they want a stage run on every time a build is manually started. You could make it more secure by changing the variable to be a Selection prompt type and supply a list of agents that can be used. You would of course need to create specific permissions for editing variables and allow only admins to edit variables.