| Table of Contents |
|---|
Variables, Objects & Expressions
Variables and objects are used throughout Continua and they enable dynamic properties and values to be used during your build process. Variables and objects are similar in the way they are called, however they differ in a few key areas which are explained below.
Expressions are the string representation of objects and variables which are used to access their values in various inputs throughout Continua CI.
Variables
Variables can be used during the build process and can be created at all levels of Continua CI. They are used to pass dynamic values into the build process. Additional information on variables can be found on the Variables page.
Variable Definition and how they differ from Objects
Variables differ from objects as they have the following properties:
- Variables are defined by either the user or pulled from the server's environment variables.
- A Variable can only ever contain 1 value.
- Variables can be created at the following levels: Build, Configuration, Project and Application. Variables can also exist at the Environment level however these variables are pulled directly from the server's environment variables.
- Variables can be accessed by surrounding the variable name with the '%' character. For example, all variables can be accessed with %myBuildVariableName% while a specific variable can be accessed by provided a namespace prefix. For example, a project variable can be accessed with %Project.myProjectVariableName%.
Variable Namespaces
Variable namespaces control where a variable exists within the Continua CI environment. Namespaces also provide variables with a scope which limits what each build can access. For example, if you create a configuration variable then only builds from that configuration can access that variable.
Environment Variables
Environment variables are created from the server's environment variables automatically and cannot be changed. These variables can be accessed system wide by every build. Environment variables are always read-only and they can be accessed with the %Environment.MyVariableName% or %MyVariableName% syntax.
Application Variables
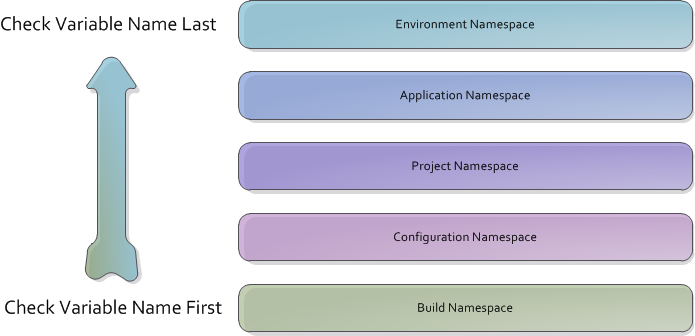
Application variables are system wide variables that every build, configuration and project can access. This means that any variable defined in the application can be used throughout Continua and created at certain levels in the hierarchy. Environment variable are there by default and cannot be changed, they're the last variable namespace checked when determining a variable's value. The next level of variables checked at the Application level which is the highest level a user can define a variable. A variable defined in the Application namespace can be used anywhere in Continua . The next level of variables are for projects which are defined on the project wizard page followed by configuration variables which are on the configuration wizard page. The final variable namespace and the one at the top of the hierarchy is the Build Namespace. There are 3 ways to define a build level variable. When a build is triggered (defined when creating the trigger), when manually starting a build that prompts for variables and when setting a variable in a stage using the Set Variable Action. Variables can have a value type of Text, Numeric or Expression. Expression variables can contain references to other variable or objects. Variables can later be referenced using the Objects and Expressions Syntax.
Objects & Expressions
Throughout Continua you will come across input fields which accept Expressions in their value. Expressions are built up at design time then evaluated at run time. An Expression can reference a Continua Variable or a Continua Object. The UI differentiates these two types by starting and ending an Expression with the "%" character for variables and a "$" character for objects, these two keys will be referred to as "starting keys". A Variable Expression would look something like "%Configuration.MyOwnVariable%" and an Object Expression would look something like "$Build.BuildNumber$". To determine if an input field accepts Expressions as values, press a starting key and wait for the auto-complete drop down to appear below the input field.
Here's an example of pressing the Continua Object starting key.
The auto-complete drop down for a Continua Object contains a list of selectable options of object and value type. If an item in the drop down has a ![]() icon next to it, it's an object type. Object types mean the object has children which can be object and value types. For example, in the drop down in the image above, "Build" has the object icon which means it's an object type. When selecting the Build option you will see a new list of items of that belong to the build. Value types are denoted by the
icon next to it, it's an object type. Object types mean the object has children which can be object and value types. For example, in the drop down in the image above, "Build" has the object icon which means it's an object type. When selecting the Build option you will see a new list of items of that belong to the build. Value types are denoted by the ![]() icon. Value types have no children and are the last selectable item in the drop down.
icon. Value types have no children and are the last selectable item in the drop down.
Note: It's possible for object types with children to be used as value types since they can have a default value. This is explained below in the Default Values section.
Here's an example of pressing the Continua Variable starting key.
The auto-complete drop down for a Continua Variable is similar to Continua Objects. Value types are also denoted by the ![]() icon and are named after the name of the variable. The equivalent object type for variables is denoted by the folder icon
icon and are named after the name of the variable. The equivalent object type for variables is denoted by the folder icon ![]() and represent a variable namespace. Namespaces are capable of having children which are the variables in that particular namespace.
and represent a variable namespace. Namespaces are capable of having children which are the variables in that particular namespace.
Drop Down Usage and Auto Complete Shortcut keys
Navigating the drop down is possible by using the Up, Down, Home and End keys. Up and Down will highlight the previous or next item in the list, respectively. Home highlight the first item in the list and End highlights the last. The drop down will display a maximum of 10 items but you can get to the other items by using the Up/Down keys. Home and End only applies to the viewable items in the drop down.
To select an item you can use either Enter or Space. When using Enter on a value type item, the cursor will be placed after the closing character of the expression since value types have no children you can get values from. If the type is an object then Enter will place the cursor at the end of the selected object's text and before the closing character of the expression. To get the next list of options in the drop down for that object type, press the period key. Alternatively, you can use Space to select an item. If the item selected is a value type then the expression will be completed and a space added at the end of the closing character. If the item selected is an object type, Space will complete the expression and put the cursor immediately after the closing character.
As you type in the middle of the expression, the drop down list will filter its results based on the text entered. While the cursor is in the middle of an expression you can also use the key combination of [CTRL]-[.] or [CTRL]-[Space] to display the drop down with available options. The auto-complete behavior will come into effect and take into account what has already been entered into the expression to formulate the selectable items in the drop down.
Default Values
Some object types are overloaded to behave like both objects and values. The most common time an object will be used as a variable is when an expression is used to get a repositories' source directory. For example, if I want to refer to a build's version I would use the expression "$Build.Version$". However, when typing that into an input field, you will note that "Version" is an object type that has children objects ("Default" and "DotNet"). If you select the "DotNet" item you will then get a drop down of items which are all value types ("Major", "Minor", "Build", "Revision"). If you wanted to get only the major version value of your version string then you would use the expression "$Build.Version.DotNet.Major$". Build Version is only one example where you may want to use the default value and not any of its children.
Here's a list of other important object types that have default values:
| Expression | Value |
|---|---|
| $Source.YourRepository$ | The path to your Source directory within a build's workspace. Equivalent to $Source.YourRepository.Path$ |
| $Date$ | Defaults to local time (of server). Equivalent to $Date.Local$ |
| $Server$ | Default to Server Name. Equivalent to $Server.HostName$ |
CI. These are the highest variables that the user can define. Application variables are read-only at run time and they can be accessed with the %Application.MyVariableName% or %MyVariableName% syntax.
Project Variables
Project variables are created on a specific project and they can only be accessed by configurations and builds that belong to that project. Project variables are read-only at run time and they can be accessed with the %Project.MyVariableName% syntax.
Configuration Variables
Configuration variables are created on a specific configuration and they can only be accessed by builds that belong to that configuration. Configuration variables are read-only at run time and they can be accessed with the %Configuration.MyVariableName% syntax.
Build Variables
Build variables belong to a specific build however they cannot be created manually. They are used to override any of the variables listed above. Build variables can be updated at runtime - see the next section for more information on how build variables work. Build variables can be accessed with the %MyVariableName% syntax (Note that you cannot use the Build namespace prefix).
Variable Namespace Hierarchy
Continua CI's namespace hierarchy is designed around the idea that variables with the same name can override each other at run time. Variables will only override each other if no namespace prefix is used when accessing the variable.
For example, lets say you have 2 variables called myVariable. One of these values is defined on the configuration while the other is defined on the project.
myVariable in the configuration namespace is assigned the text "my configuration value!"
myVariable in the project namespace is assigned the text "my project value!"
During the build process, if I access myVariable with the correct namespace I will get the following values:
- %Configuration.myVariable% = "my configuration value!"
- %Project.myVariable% = "my project value!"
However, if I access myVariable without a namespace I will get the following value:
- %myVariable% = "my configuration value!"
In this scenario, when accessing myVariable without a prefix, it will always return the Configuration value instead of the Project as it will return the variable in the lowest namespace it can find.
Overriding Variable Values
As environment, application, project and configuration variables are all read-only at run-time, their values will never change during the course of a build. All of these variables can be considered as constants at run-time. If you set the value of one of these variables during your build process, you are not actually changing the value of that variable. Instead, you are creating a new build variable with the same name which will contain the new value. This means that if you ever want to access the new value, you cannot use namespace prefixes when calling a variable in an expression.
To demonstrate changing a variable's value, lets use the myVariable example above. So lets say we have configuration variable called myVariable and its value is "my configuration value!".
In our build process we include a Set Variable Action that sets myVariable to "my new value!".
After the Set Variable action has run, if we access myVariable we will get the following values:
- %Configuration.myVariable% = "my configuration value!"
- %myVariable% = "my new value!"
You can see that changing the value of myVariable did not override the value but rather created a Build Variable with the same name. Note that you cannot prefix build variables with the Build namespace.
So if you use the namespace prefix on a variable you will always get the variable's value at the start of the build, not the updated value.
Setting Variable Values
Variable values can be set in a number of ways within Continua CI. (Note that by setting a variables value you are actually creating a build variable with the same name and setting its value, as explained above):
- Original Values: All Configuration, Project and Application variables can be given a value when creating the variable.
- Set Build Variable values when manually queuing a build: All build variables can have their values changed when you manually start a build. Note that the variable must have a prompt type before they can be overridden when manually queuing a build.
- Set Build Variable values when automatically triggering a build: Build variable values can be set by Triggers when they automatically queue a build.
- Set Build Variable values during the build with the Set Variable Action: The Set Variable Action allows you to change a build variable's value during the build process.
Objects
Objects are created automatically by Continua and they contain properties that relate to various aspects of Continua. For example, there are Build, Configuration and Project objects which include properties regarding the current build, configuration or project respectively. Additional information and a list of available objects can be found on the Expression Objects page.
Object Definition and how they differ from Variables
Objects differ from variables as they have the following properties:
- Objects are native to Continua and are defined by Continua. Continua includes several objects such as Server, Agent, Build, etc. These objects store properties regarding that object. For example, the server hostname can be accessed with $Server.HostName$ and the Build number can be accessed with $Build.BuildNumber$
- Objects can contain multiple properties and objects. For example, the Server object includes the HostName property and the Now and NowUtc objects.
- Objects and object properties can be accessed by surrounding the object and it's sub properties with the '$' character. For example, repositories can be accessed using the following format: $Repository.my_repository_name$.
Expressions
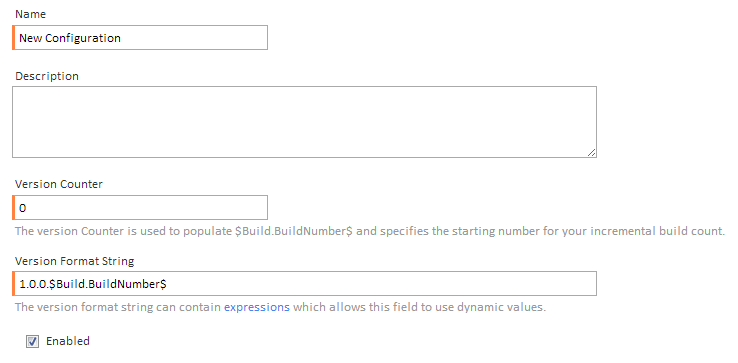
Expressions are the string representation of objects and variables which are used to access their values. Expressions can access both variables and objects and they are built up at design time then evaluated at run time. For example, each configuration contains a Version Format String property that is used to set the version number of each build. By default, this property uses the expression 1.0.0.$Build.BuildNumber$ (as shown below).
This expression contains two parts:
- 1.0.0.: This is the first part of the expression and is simply plain text. Every time a build is created, its version number will begin with 1.0.0..
- $Build.BuildNumber$: This is the second part of the expression and this is calling the BuildNumber property on the Build object. The BuildNumber property is an integer that increments for each build that is created in a configuration. Every time a build is created, its version number will end in its current build number.
When this expression is evaluated, you will get the following results for each subsequent build:
- 1.0.0.0
- 1.0.0.1
- 1.0.0.2
- ...
- 1.0.0.1235234
Many inputs in Continua accept expressions as values. Most fields that accept expressions will be denoted with the  icon, however you can also determine whether they are accepted by entering the '%' or '$' character. If the expression auto-complete drop down appears then the field accepts expressions.
The Expression Drop Down
Every input that accepts expressions includes the expression auto-complete drop down to help you determine which variables and objects can be used. This drop down will show the following object types:
- Variables and Object properties: These items contain a single value and do not have any children. They are denoted with the
 icon and are the last selectable item in the drop down.
 - Objects: Objects contain a list of properties and child objects which can be accessed by adding the '.' (full stop) character to the end of the Object name. Objects are denoted with the
 icon. If an object is referenced in an expression without specifying a child property then the object's default property will be used.
 - Variable Namespaces: Namespaces can only be accessed when accessing variables and they are used to access variable values specific to a certain namespace (ie. Configuration, Project, etc.). For example, typing %Project.% will bring up a list of all Project variables. Namespaces are denoted with the
 icon.
icon.
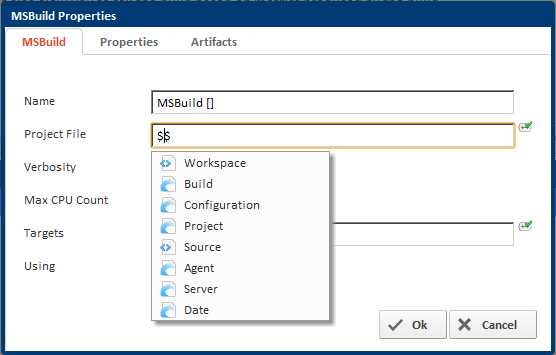
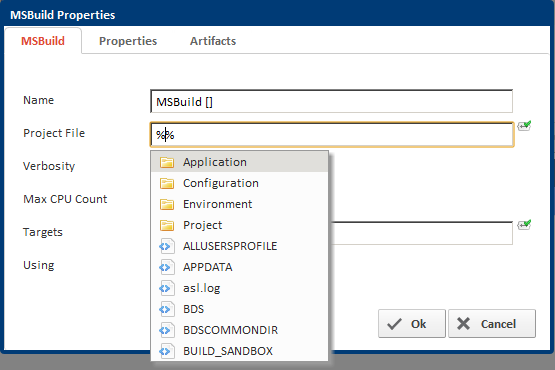
Below are some examples of the expression drop down being used in the MSBuild action.
Accessing Objects through Expressions
This screenshot demonstrates the objects and properties that are shown when you begin declaring an object by entering the '$' key. When the '$' key is first entered, the drop down will display all root objects that are available for the expression.
Note that child objects are denoted with the ![]() icon while properties use the
icon while properties use the ![]() icon.
icon.
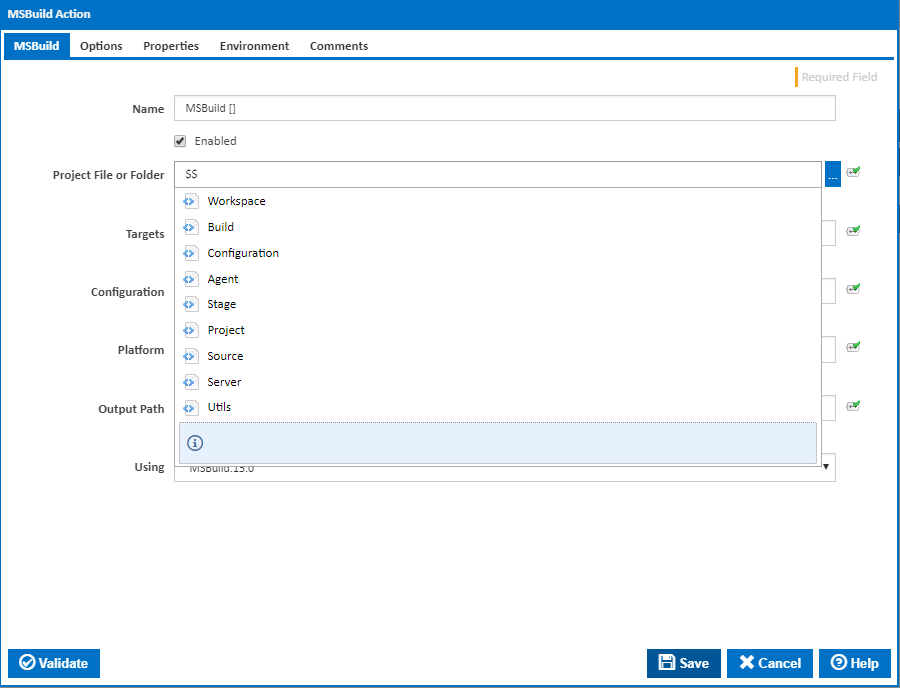
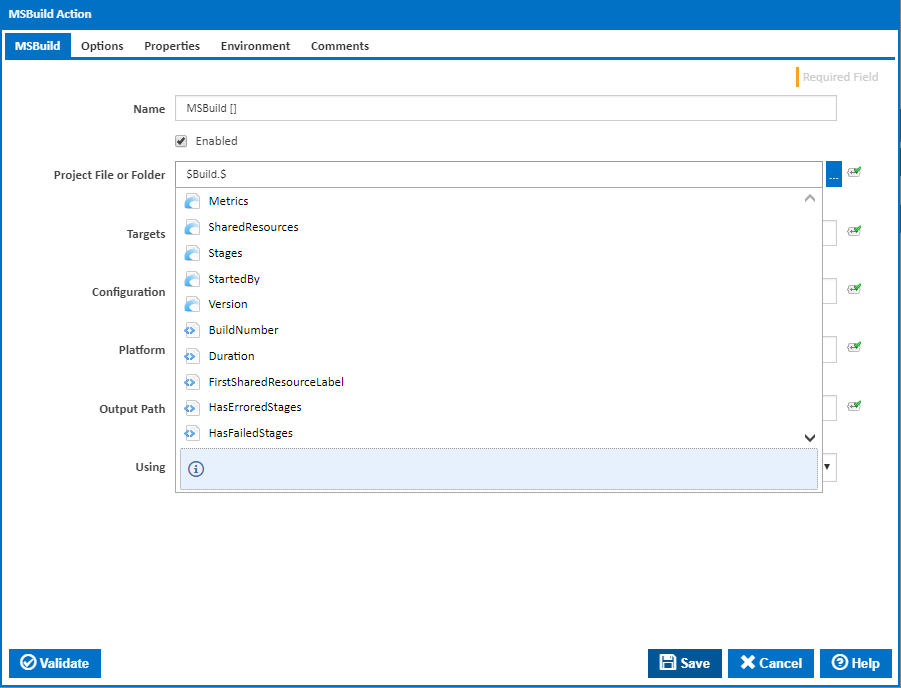
As stated above, if you select an object (ie. $Build.$), all the object's properties and sub-objects will be shown in the drop down.
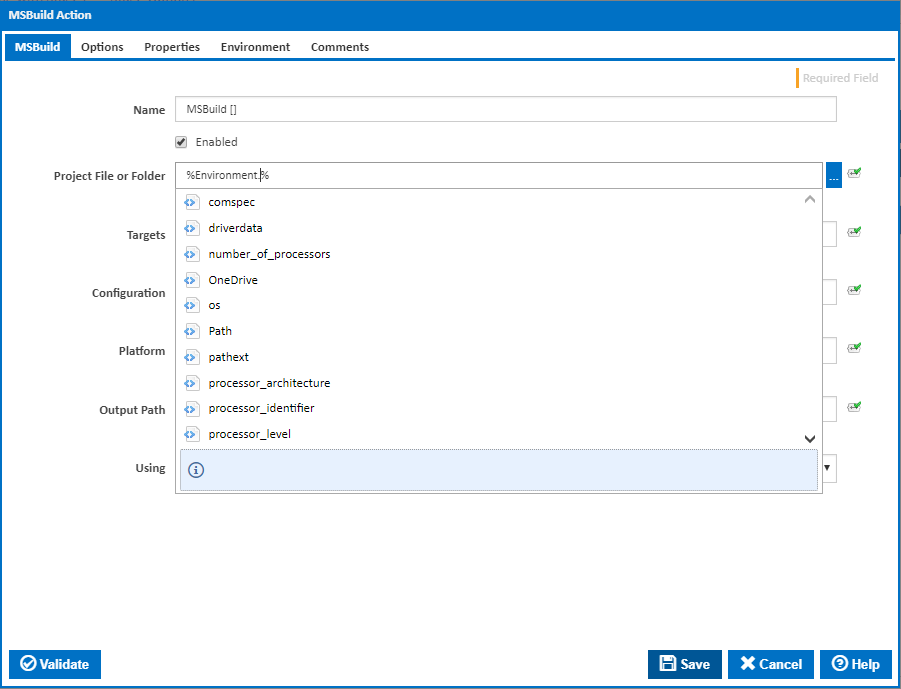
Accessing Variables through Expressions
When you initially access variables, the root drop down will show all namespaces and every single variable that is available in all namespaces.
Note that namespaces are denoted with the icon while variables use the ![]() icon.
icon.

If you select a namespace then you will only see variables in that namespace.
Drop Down Usage and Auto Complete Shortcut keys
The auto-complete drop down will only ever display a maximum of 10 items at a time. You can navigate through your list of elements by using the mouse wheel, the up and down arrows and the home and end keys.
Once the correct item is selected, pressing enter or tab will enter that value into the input field. Putting a '.' (full stop) at the end of the object name will display any children of that object.
Note that if the auto-complete drop down disappears, you can display it again by pressing ctrl + space.
...