...
This page discusses information regarding the hands-on use of variables.
| Table of Contents |
|---|
Additional Variable Information
| Children Display |
|---|
Variable Types
Each variable must be assigned a type which limits what time of information can be stored in a variable. Note that all variable types, except expression variables, can have their values changed during the build process.
Variables can be one of the following types:
Expression
Expression variables store an expression that will be evaluated every time the variable is used. For example, you could assign an expression variable the value '$Server.Now$' which will translate to the current server time every time it is called.
Text
Text variables store any values as plain text. Regardless of the values that are entered into a text variable, the value will always be returned as a plain string.
Numeric
Numeric variables can only contain numbers.
Date Time
DateTime variables can only contain full datetime values. These values are always converted to UTC time when the value is saved.
Date
Date variables can only contain date values. Note that these values are stored as is, and they are not converted to UTC time.
Time
Time variables can only contain time values. Note that these values are stored as is, and they are not converted to UTC time.
Password
Password variables store passwords that are hidden from the user at every opportunity within Continua. Note that password variables should only be used in password fields for actions so that their value can be masked correctly. If they are used in a standard text field, their value will be displayed in the build log.A full list of variable types can be found on the Variable Types page.
Variable Prompt Types
All configuration variables can be assigned a prompt type which enables users to set a variable's value when queuing a manual build. The variable prompt types that are available depend on the the variable type. For example, DateTime variables can only have a DateTime prompt type.
Note that if no prompt type is specified then users cannot change a variables value when a build is queued manually. Also, only configuration variables can be given prompt types as they are the only variables that can be modified when a build is queued.
Continua CI includes the following prompt types:
Text
The text prompt type enable users to override the variables value with any text. As shown below, text prompt types do not limit what the user can enter for the variable's value.

Memo
The memo prompt type is the same as the text prompt type except the users can enter values in a larger text area.

Password
The password prompt type enable users to override variables with any text, however it also masks the input. To change the value of a password prompt type, the user must first 'unlock' the field by clicking the lock button. If the field remains locked then the original value will be used. If the field is unlocked, the variable's value will be changed to whatever is entered in this field. Note that an unlocked, empty field will set the variable value to empty.
A 'locked' password field

An 'unlocked' password field

Date Time
The date time prompt type limits the user so they can only enter a full date time. Note that the datetime will be stored in UTC time.
If your variable does not have a default value then the default value shown in the queue dialog will be the current date time. If an invalid datetime is saved as the variable's default value, it will also display the current datetime.

Time Span
The time span prompt type asks the user to enter a time length for the variable.

Date
The date prompt type limits the user so they can only enter a date without the time component.

Time
The time prompt type limits the user so they can only enter a time without the date component.

Selection
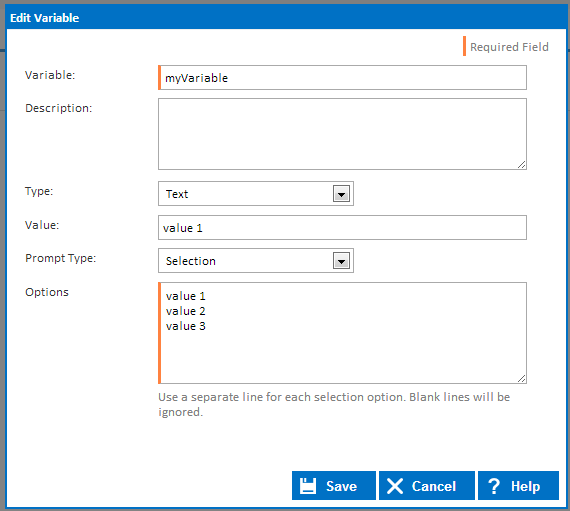
The selection prompt type limits the user so that they can only pick one specific value. These values are pre-defined on the variable itself.
Each value must be on a new line when defining your values.
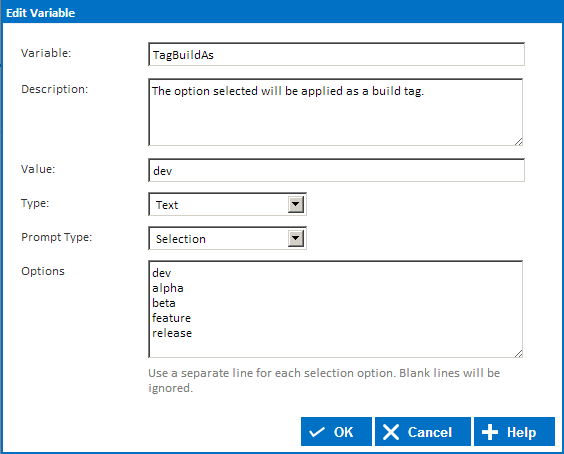
This figure demonstrates how you define your selection values.
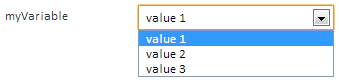
The figure below shows what the user will see when they manually queue a build.
Multiple Selection
The multiple selection prompt type limits the user so that they can pick multiple specific values. These values are pre-defined on the variable itself.
Each value must be on a new line when defining your values.
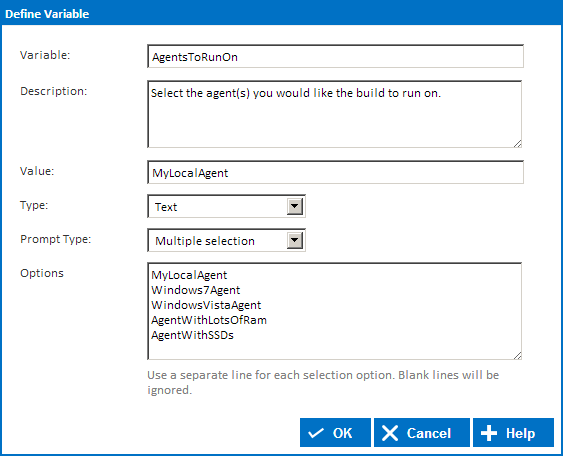
This figure demonstrates how you define your selection values.
The figure below shows what the user will see when they manually queue a build.

Boolean
The boolean prompt type limits the user so they can only tick true or false for the variable value. This is shown on the queue dialog as a checkbox, as shown below.

Variable Namespaces
Build Variables
Configuration Variables
Project Variables
Application Variables
Environment Variables
Creating and Editing Variables
Configuration variables have an extra option when creating them, Prompt Type. If a prompt type is set, you will be required to supply a value for that variable when you manually start a build. The prompt type supplied determines the input field in which you supply the value.
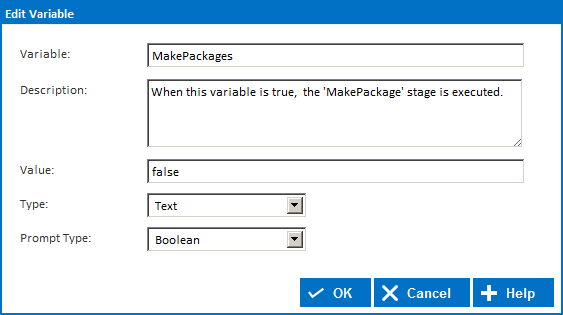
Example 1 - Text Type/Boolean Prompt Type
In this example, I've created a variable called MakePackages and set it to a Boolean prompt type.
For demonstration purposes, the mock Configuration this variable belongs to has two stages. Stage 1 builds my project and out puts a bunch of file. Stage 2 takes the output of Stage 1 and generates an installer (a.k.a makes the packages). I don't want to make the packages every time I execute the configuration though so I've setup the configuration to only execute stage 2 when the MakePackages configuration variable is set to true. By making this a prompt type variable, I will be able to supply the value of this variable whenever I manually start a build. When I manually start a build, I will see the following dialog.
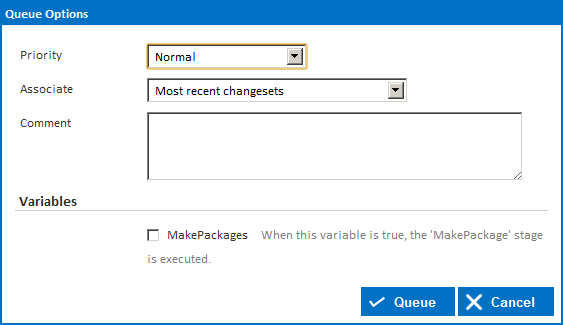
Under the Variables heading, you can see the MakePackages variable in a checkbox format. When you create a Boolean prompt type variable, it gets rendered as a checkbox because the value can either be true (checked) or false (unchecked). Now when you manually queue the configuration, you can set the value of the variable by checking or unchecking the checkbox.
Example 2 - Text Type/Selection Prompt Type
In this example, I've created a variable called TagBuildAs and set it to a Selection prompt type. This type of prompt type will display a text field in which you supply all the possible values for this variable. The value you supply in the Value field must be in the list of values you supply in the Options field.
For demonstration purposes, the mock Configuration this variable belongs to has a Tag Build action which contains the value %TagBuildAs% as one of its values. This means the build will be tagged with whatever value the variable TagBuildAs contains. By making TagBuildAs a selection prompt type variable, the user can select which value to use when manually starting a build. If you were to manually start a build, you would see the following dialog.
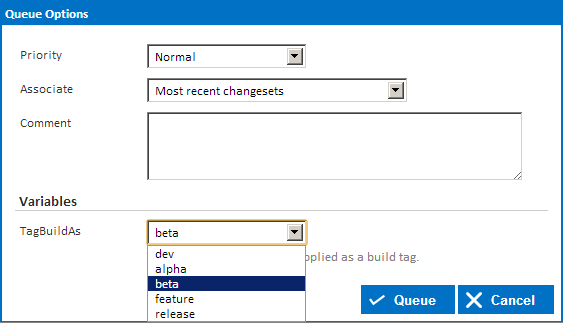
Now when you start a build you can specify the value from the drop down list.
Example 3 - Text Type/Multiple selection Prompt Type
In this example, I've created a variable called AgentsToRunOn and set it to a Multiple selection prompt type. This type of prompt type will display a text field in which you supply all the possible values for this variable. The value you supply in the Value field must be in the list of values you supply in the Options field.
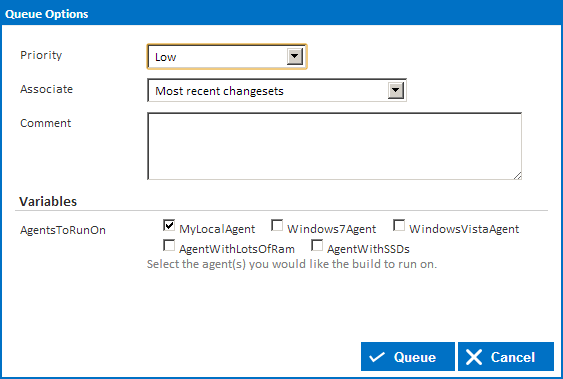
As a result of this prompt type variable, you will now see each agent name with a checkbox next to it when you manually start a build.
For demonstration purposes, the mock Configuration this variable belongs to has a check before each stage (using Agent Requirements in Stage Options) that checks to see if the Agent's hostname is in the list of options you selected when the build was manually started. Here's an example of what a stage might look like with this kind of agent requirement.
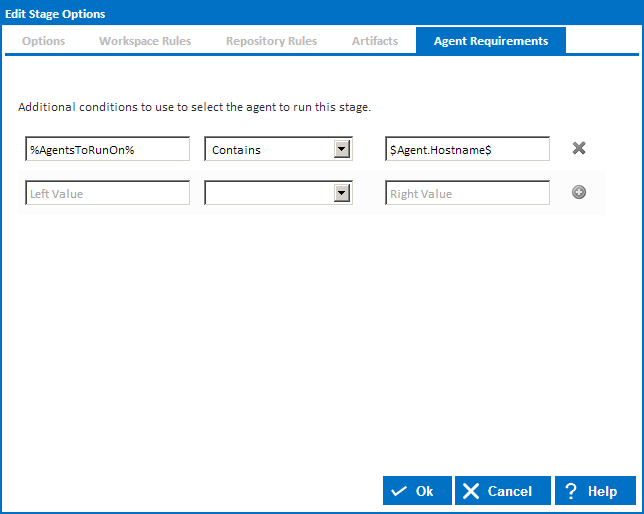
At build time, %AgentsToRunOn% will contain every value you ticked on the queue dialog, in other words, every agent host name you specified. By selecting the Contains operator then specifying the expression $Agent.Hostname$, you're basically saying "Only run this stage when the list of agents I selected on the queue dialog contains the name of any agent registered with Continua".
Note: When explicitly forcing a stage to run on an agent, you bypass all the advantages of agent compatibility. If the agent you forced a stage to run on is unable to execute the stage then the build will sit on the queue waiting for a compatible agent whose name is the one you explicitly told the stage to run on. It will not under any circumstance pick an agent that's compatible whose name doesn't match the one or ones you specified.
Configuration Variables can be given the following prompt types:
- Text
- Memo
- Password
- Numeric
- Date Time
- Time Span
- Date
- Time
- Selection
- Multiple Selection
- Boolean
Read the Variable Prompt Types page for more information on these prompt types.
Variable Namespaces
Variable namespaces control where a variable exists within the Continua CI environment. Namespaces also provide variables with a scope which limits what each build can access. For example, if you create a configuration variable then only builds from that configuration can access that variable.
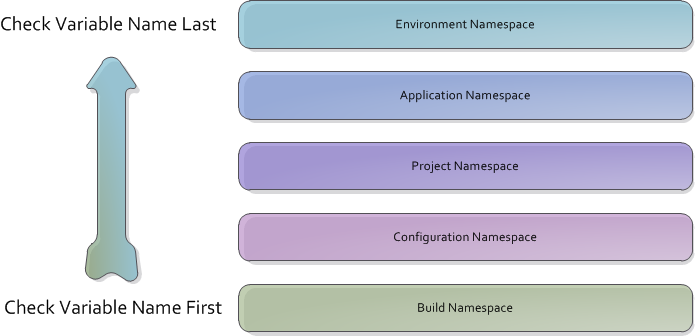
Continua uses a namespace hierarchy (as shown below) to determine which variable value should be returned when no namespace has been defined. Read the Variable Namespace Hierarchy section on the Variables, Objects & Expressions concept page for a closer look at how the Continua hierarchy works.
Build Variables
Build variables belong to a specific build however they cannot be created manually. They are used to override any of the variables listed below. See the next section for more information on how build variables work. Build variables can be accessed with the %MyVariableName% syntax (Note that you cannot use the Build namespace prefix).
When a build is created, it automatically creates build variables for every configuration variable that has been defined. It automatically sets the build variable's value to the same value as the configuration variable unless the value is overridden automatically with Triggers or manually through the queue dialog.
Configuration Variables
Configuration variables are created on a specific configuration and they can only be accessed by builds that belong to that configuration. Configuration variables are read-only at run time and they can be accessed with the %Configuration.MyVariableName% syntax.
Configuration Variables can be created, modified and deleted through the Configuration Wizard.
Project Variables
Project variables are created on a specific project and they can only be accessed by configurations and builds that belong to that project. Project variables are read-only at run time and they can be accessed with the %Project.MyVariableName% syntax.
Project Variables can be created, modified and deleted through the Project Wizard.
Application Variables
Application variables are system wide variables that every build, configuration and project can access. This means that any variable defined in the application namespace can be used anywhere in Continua CI. These are the highest variables that the user can define. Application variables are read-only at run time and they can be accessed with the %Application.MyVariableName% syntax.
Application Variables can be created, modified and deleted through the Variables page in the administration section.
Environment Variables
Environment variables are created from the server's environment variables automatically and cannot be changed. These variables can be accessed system wide by every build. Environment variables are always read-only and they can be accessed with the %Environment.MyVariableName% syntax.
Creating and Editing Variables
Configuration, Project and Application variables are all created in the same way through their respective pages. So configuration variables are created through the Configuration Wizard, project variables are created through the Project Wizard and application variables are created through the variables page in the administration section.
All variables, regardless of their namespace, are created in the same way. The only exception are Configuration variables which can also be assigned a prompt type.

When defining a variable, you can specify the following properties:
Name
The name is what you will reference whenever you call this variable. In the screenshot above, I would reference this variable with the following syntax: %myVariable%
Description
This description is shown on all variables pages and it is also displayed on the Queue Build dialog as help text.
Type
Variables can be set to several different types that affect which values can be stored in the variable. The Variable Types page has a full list of types and their definitions.
Prompt Type - Configuration Variables Only
Prompt types determine what values the user can specify when a build is queued manually. The Variable Prompt Types page has a full list of prompt type and their definitions.
Value
This is the actual value that the variable will store. Note that all variables (except Build variables) will never change their value during the build process. Instead, if you change a variables value, it will create a build variable with the same name and the new value.
Sensitive
If this is ticked, the variable's value from build logs and other sensitive areas is masked.
Additional fields if a prompt type is selected:
Display Order
The order of variable prompts in the queue options dialog.
Required
Tick to add validation to require input for this variable on the Queue and Promote Options dialogs.
Read-only promotion
Tick to prevent users changing the variable value when manually promoting a stage.
Options - Dropdown select or Checkbox select only
Use a separate line for each selection option. Blank lines will be ignored.